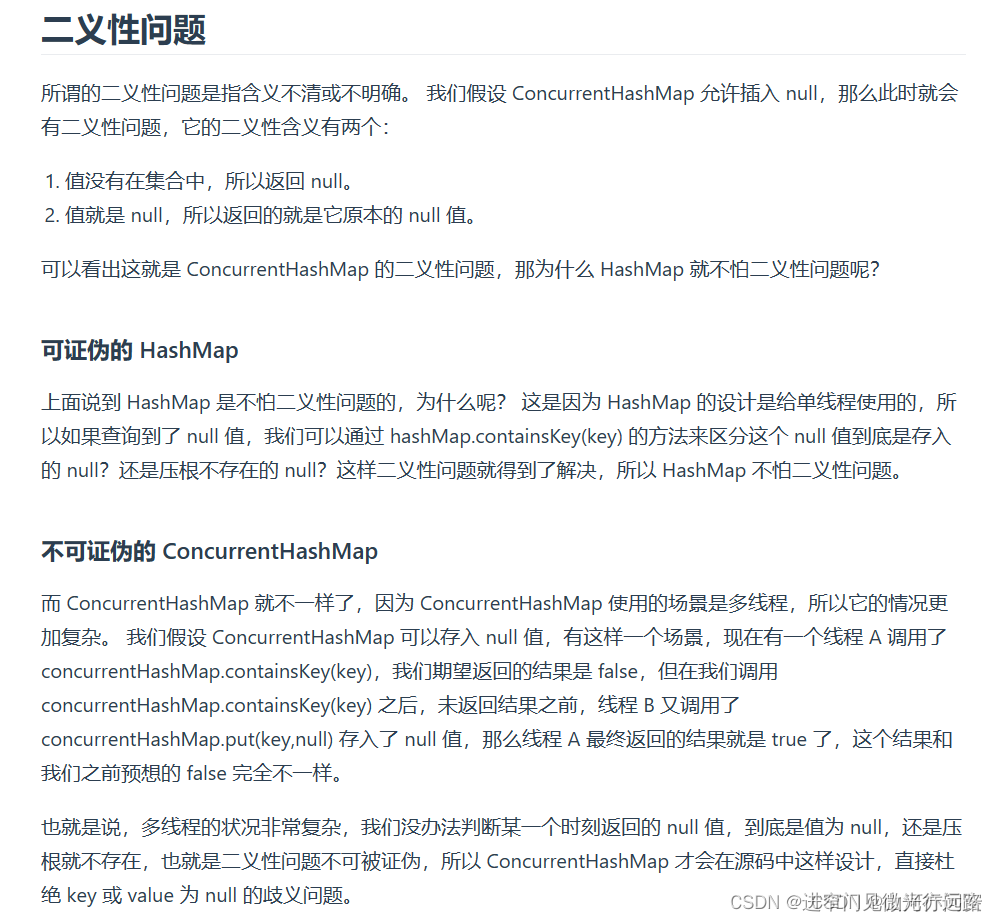
1. 环境要求
- 首先需要有kubernetes集群环境,搭建kubernetes集群可以使用kubeSphere、kubespray等工具安装集群。
- 其次要安装helm,并且添加了可用的Chart仓库
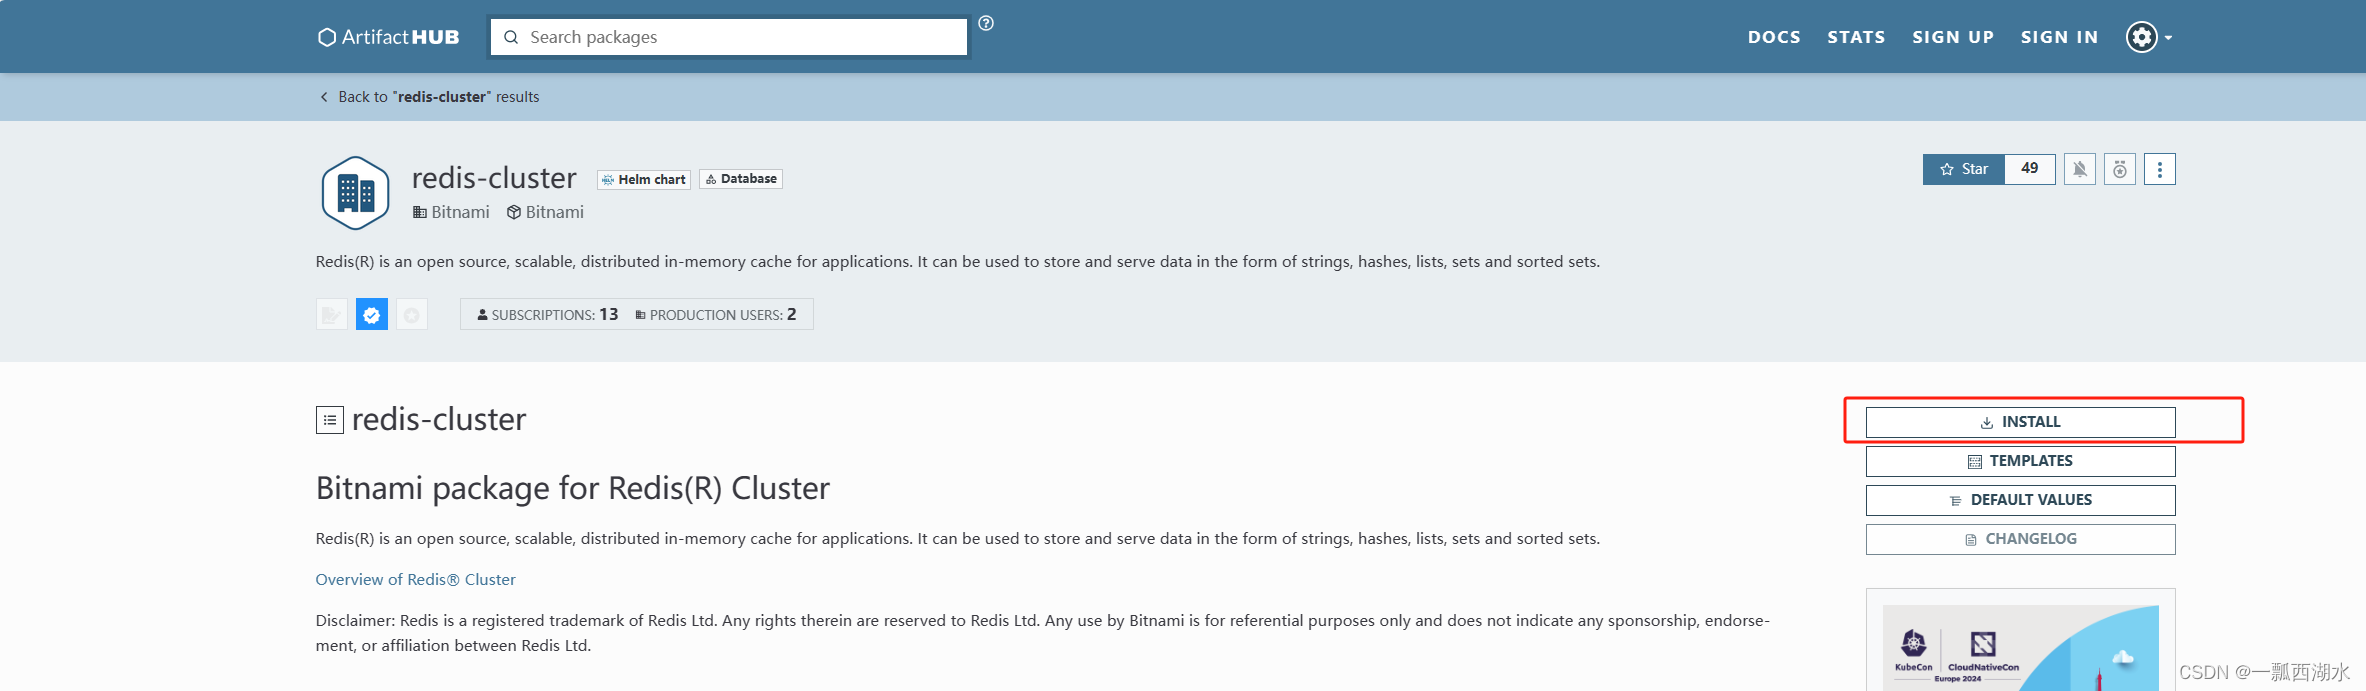
2. 确认合适的Chart包
helm官网上搜索redis
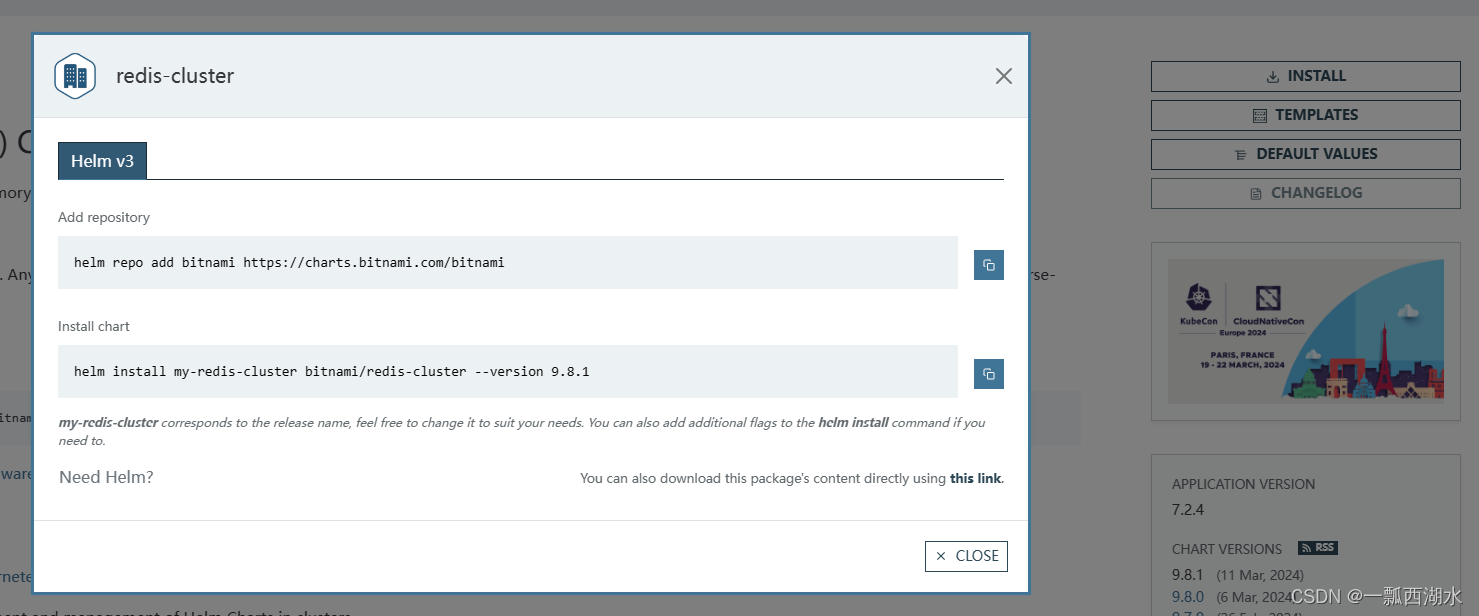
找到Star数多的Chart包,一类是redis包,一类是redis-cluster,顾名思义,redis-cluster是笔者所需的集群模式的redis的Chart包,而另外一个是单机模式或者主从模式的Chart包。点击右侧的INSTALL,即可得到添加相应仓库的命令,机器上运行命令。
//添加仓库
helm repo add bitnami https://charts.bitnami.com/bitnami
//安装
helm install my-redis-cluster bitnami/redis-cluster --version 9.8.1
]# helm install my-redis-cluster bitnami/redis-cluster --version 9.8.1
WARNING: This chart is deprecated
NAME: my-redis
LAST DEPLOYED: Tue Mar 12 17:56:38 2024
NAMESPACE: my-namespace
STATUS: deployed
REVISION: 1
TEST SUITE: None
NOTES:
This Helm chart is deprecated

Given the `stable` deprecation timeline (https://github.com/helm/charts#deprecation-timeline), the Bitnami maintained Redis Helm chart is now located at bitnami/charts (https://github.com/bitnami/charts/).

The Bitnami repository is already included in the Hubs and we will continue providing the same cadence of updates, support, etc that we've been keeping here these years. Installation instructions are very similar, just adding the _bitnami_ repo and using it during the installation (`bitnami/<chart>` instead of `stable/<chart>`)

$ helm repo add bitnami https://charts.bitnami.com/bitnami
$ helm install my-release bitnami/<chart>           # Helm 3
$ helm install --name my-release bitnami/<chart>    # Helm 2


To update an exisiting _stable_ deployment with a chart hosted in the bitnami repository you can execute
                                                                                                                                                                                                                                                                                                                                                                 $ helm
 repo add bitnami https://charts.bitnami.com/bitnami
  $ helm upgrade my-release bitnami/<chart>


  Issues and PRs related to the chart itself will be redirected to `bitnami/charts` GitHub repository. In the same way, we'll be happy to answer questions related to this migration process in this issue (https://github.com/helm/charts/issues/20969) created as a common place for discussion.

** Please be patient while the chart is being deployed **
Redis can be accessed via port 6379 on the following DNS names from within your cluster:

my-redis-master.my-namespace.svc.cluster.local for read/write operations
my-redis-slave.my-namespace.svc.cluster.local for read-only operations

//执行此命令,生成一个REDIS_PASSWORD,此为redis的10位随机密码。
To get your password run:

    export REDIS_PASSWORD=$(kubectl get secret --namespace my-namespace my-redis -o jsonpath="{.data.redis-password}" | base64 --decode)

To connect to your Redis server:

1. Run a Redis pod that you can use as a client:

   kubectl run --namespace my-namespace my-redis-client --rm --tty -i --restart='Never' \
    --env REDIS_PASSWORD=$REDIS_PASSWORD \
   --image docker.io/bitnami/redis:5.0.7-debian-10-r32 -- bash

2. Connect using the Redis CLI:
   redis-cli -h my-redis-master -a $REDIS_PASSWORD
   redis-cli -h my-redis-slave -a $REDIS_PASSWORD

To connect to your database from outside the cluster execute the following commands:

    kubectl port-forward --namespace my-namespace svc/my-redis-master 6379:6379 &
    redis-cli -h 127.0.0.1 -p 6379 -a $REDIS_PASSWORD
以上两条命令可以正常安装redis集群,并且根据安装后的命令提示的信息,可以设置10位随机密码访问redis。但是为了更好的配置使用redis集群,可进行如下操作。
3. 下载Chart包
- 建立名为my-namespace的命名空间
kubectl create namespace my-namespace
- 添加仓库
//添加仓库
]# helm repo add bitnami https://charts.bitnami.com/bitnami
//查看仓库
]# helm repo list
- 搜索Chart
//查找redis
]# helm search repo redis

//执行结果
NAME                    CHART VERSION   APP VERSION     DESCRIPTION
bitnami/redis           17.1.8          7.0.5           Redis(R) is an open source, advanced key-value ...
bitnami/redis-cluster   8.2.4           7.0.5           Redis(R) is an open source, scalable, distribut...
- 下载Chart
下载Chart包相比于直接安装的好处,是可以根据需要,修改配置文件,进行个性化安装。
]# helm pull bitnami/redis-cluster

]# ll redis-cluster-8.2.4.tgz
-rw-r--r-- 1 root root 106744 9月  22 16:15 redis-cluster-8.2.4.tgz

# 解压压缩包并进入
[root@master ~]# tar -zxf redis-cluster-8.2.4.tgz && cd redis-cluster
[root@master redis-cluster]#

#查看目录结构
[root@master redis-cluster]# tree .
.
├── Chart.lock
├── charts
│   └── common
│       ├── Chart.yaml
│       ├── README.md
│       ├── templates
│       │   ├── _affinities.tpl
│       │   ├── _capabilities.tpl
│       │   ├── _errors.tpl
│       │   ├── _images.tpl
│       │   ├── _ingress.tpl
│       │   ├── _labels.tpl
│       │   ├── _names.tpl
│       │   ├── _secrets.tpl
│       │   ├── _storage.tpl
│       │   ├── _tplvalues.tpl
│       │   ├── _utils.tpl
│       │   ├── validations
│       │   │   ├── _cassandra.tpl
│       │   │   ├── _mariadb.tpl
│       │   │   ├── _mongodb.tpl
│       │   │   ├── _mysql.tpl
│       │   │   ├── _postgresql.tpl
│       │   │   ├── _redis.tpl
│       │   │   └── _validations.tpl
│       │   └── _warnings.tpl
│       └── values.yaml
├── Chart.yaml
├── img
│   ├── redis-cluster-topology.png
│   └── redis-topology.png
├── README.md
├── templates
│   ├── configmap.yaml
│   ├── extra-list.yaml
│   ├── headless-svc.yaml
│   ├── _helpers.tpl
│   ├── metrics-prometheus.yaml
│   ├── metrics-svc.yaml
│   ├── networkpolicy.yaml
│   ├── NOTES.txt
│   ├── poddisruptionbudget.yaml
│   ├── prometheusrule.yaml
│   ├── psp.yaml
│   ├── redis-rolebinding.yaml
│   ├── redis-role.yaml
│   ├── redis-serviceaccount.yaml
│   ├── redis-statefulset.yaml
│   ├── redis-svc.yaml
│   ├── scripts-configmap.yaml
│   ├── secret.yaml
│   ├── svc-cluster-external-access.yaml
│   ├── tls-secret.yaml
│   └── update-cluster.yaml
└── values.yaml

6 directories, 49 files
常见问题:
步骤 3. 下载Chart包的常见问题是,选择错了Chart包,如果是安装集群模式的redis,一定要bitnami/redis-cluster。如果选择bitnami/redis包,则安装出来的不一定是集群模式的,此时如果发现了安装的不是集群模式,直接安装到kubernetes的redis,可以修改redis.conf文件的配置cluster-enabled yes,然后重启解决。但是此处却不行,只能修改helm的values.yaml配置文件进行升级,或者直接卸载重新安装。
helm upgrade my-redis bitnami/redis-cluster -f values.yaml -n my-namespace --set password=USX6SZmvla
4. 修改配置文件
修改values.yaml的一些配置,可以进行自定义个性化安装。下面只展示需要修改的。这个配置文件的注释很重要,如果遇到问题一定要仔细看这些注释!
配置文件中每个字段的含义都可以从官方包解释中查看,链接如下:
https://artifacthub.io/packages/helm/bitnami/redis-cluster
4.1 修改点1:修改密码为redis123
## @param global.imageRegistry Global Docker image registry
## @param global.imagePullSecrets Global Docker registry secret names as an array
## @param global.storageClass Global StorageClass for Persistent Volume(s)
## @param global.redis.password Redis® password (overrides `password`)
##
global:
  imageRegistry: ""
  ## E.g.
  ## imagePullSecrets:
  ##   - myRegistryKeySecretName
  ##
  imagePullSecrets: []
  storageClass: ""
  redis:
  //修改点1:修改密码为redis123
    password: "redis123"
  ## Compatibility adaptations for Kubernetes platforms
4.2 修改点2-3-4:修改SVC的External-IP
- 修改点2:默认为公网IP,此处修改为内部负载均衡IP
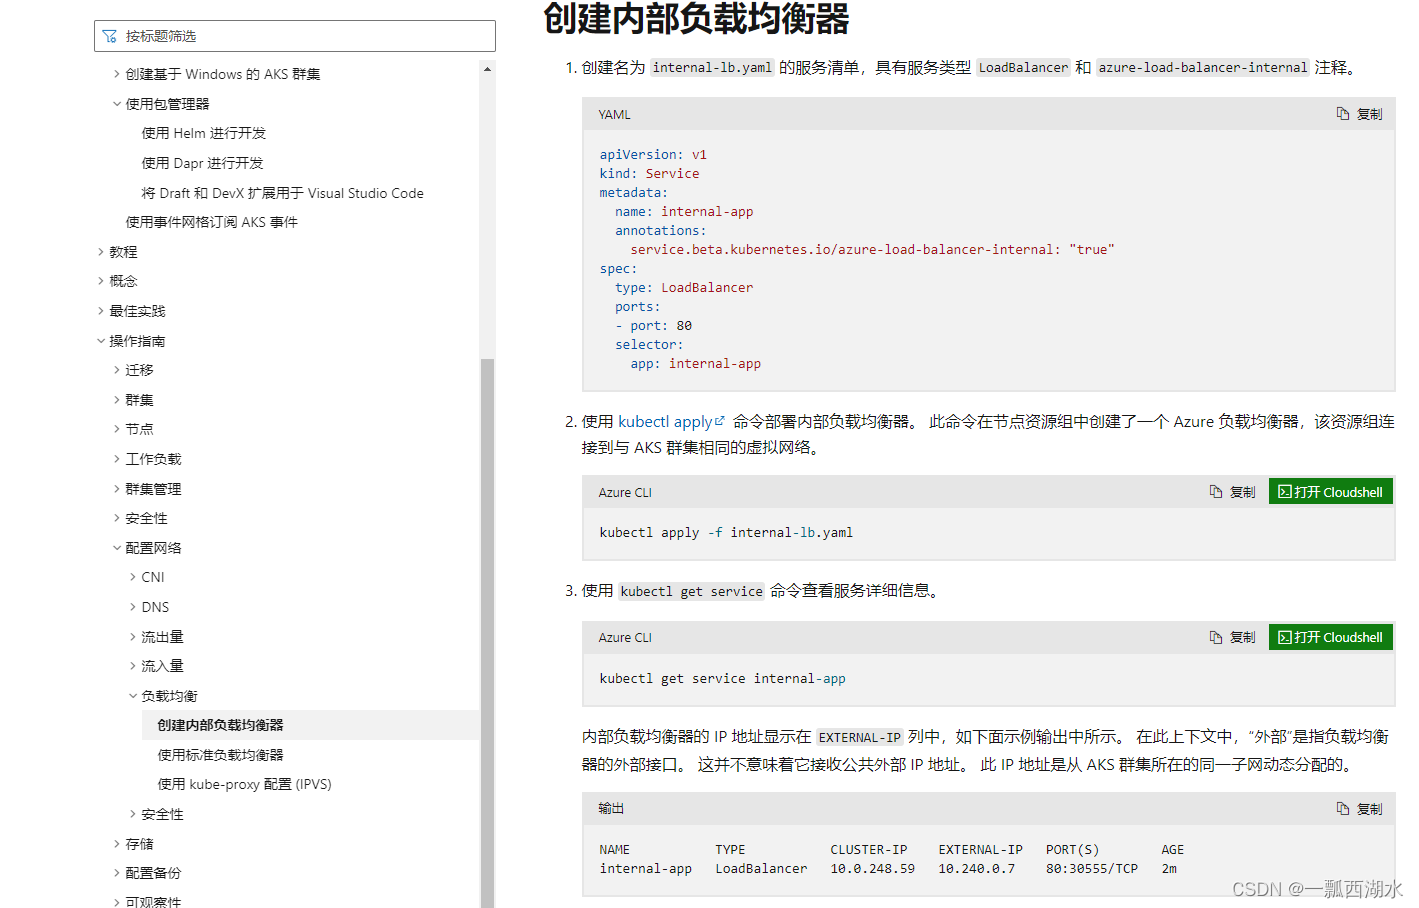
此处如果不修改,则安装后的redis集群的SVC是External-IP是公网IP,但是笔者搭建的redis集群是信息系统内部使用,只需开放内部负载均衡IP,可以查看上方注释中的链接,此链接中根据不同的云环境,对修改方法进行了指导。
https://kubernetes.io/docs/concepts/services-networking/service/#internal-load-balancer
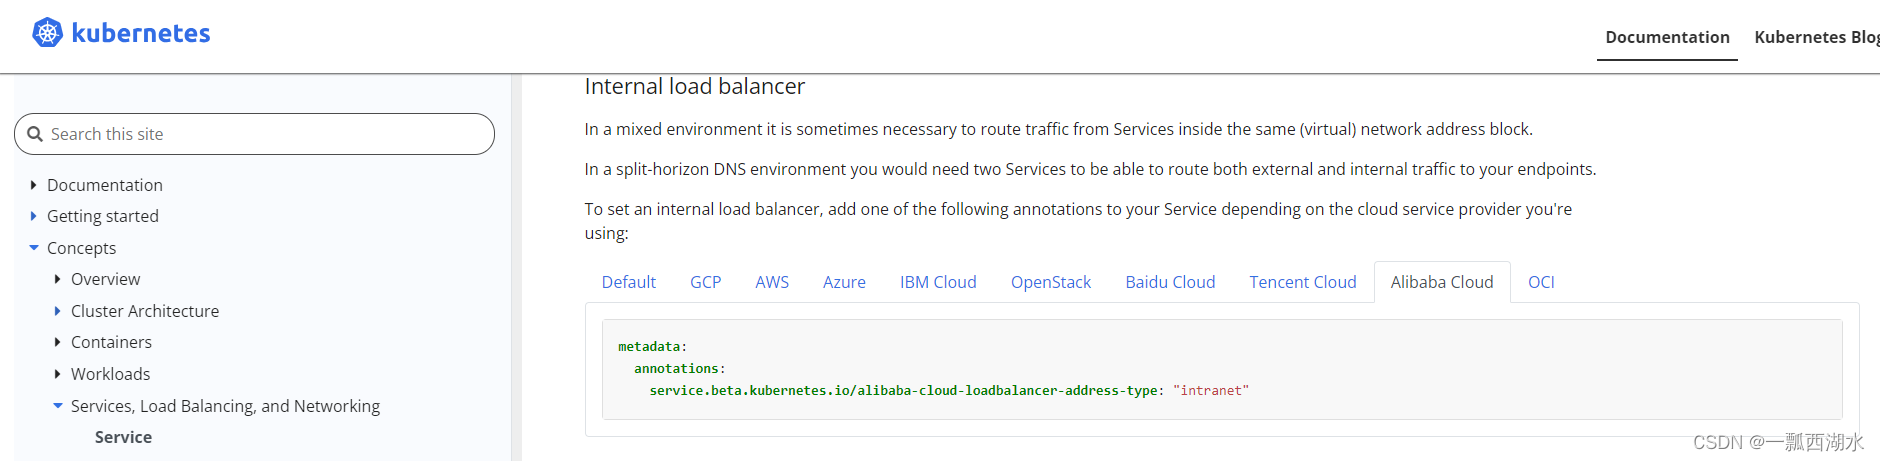
也可以去对应的云服务商的教程文档中查看。
!!如果不修改此注解,不会生成内部负载均衡器,安装后查询SVC信息时,EXTERNAL-IP为公网IP
//查看server
]# kubectl get svc -n redis-namespace
NAME                                TYPE        CLUSTER-IP      EXTERNAL-IP   PORT(S)              AGE
my-release-redis-cluster            LoadBalancer   40.20.161.245   40.20.162.245        6379/TCP             11m
my-release-redis-cluster-headless   ClusterIP   None            <none>        6379/TCP,16379/TCP   11m
- 修改点3:默认为ClusterIP,修改为LoadBalance
默认为ClusterIP,安装后查询SVC信息时,TYPE列为ClusterIP,无法提供访问redis集群的IP
//查看server
]# kubectl get svc -n redis-namespace
NAME                                TYPE        CLUSTER-IP      EXTERNAL-IP   PORT(S)              AGE
my-release-redis-cluster            ClusterIP   10.20.161.245   <none>        6379/TCP             11m
my-release-redis-cluster-headless   ClusterIP   None            <none>        6379/TCP,16379/TCP   11m
修改为LoadBalance
//查看server
]# kubectl get svc -n redis-namespace
NAME                                TYPE        CLUSTER-IP      EXTERNAL-IP   PORT(S)              AGE
my-release-redis-cluster            LoadBalancer   10.20.161.245   172.16.0.8        6379/TCP             11m
my-release-redis-cluster-headless   ClusterIP   None            <none>        6379/TCP,16379/TCP   11m
- //修改点4:可以指定IP,不指定则系统自动分配
## Redis® Service properties for standalone mode.
##
service:
  ## @param service.ports.redis Kubernetes Redis service port
  ##
  ports:
    redis: 6379
  ## Node ports to expose
  ## ref: https://kubernetes.io/docs/concepts/services-networking/service/#type-nodeport
  ## @param service.nodePorts.redis Node port for Redis
  ##
  nodePorts:
    redis: ""
  ## @param service.extraPorts Extra ports to expose in the service (normally used with the `sidecar` value)
  ##
  extraPorts: []
  ## @param service.annotations Provide any additional annotations which may be required.
  ## This can be used to set the LoadBalancer service type to internal only.
  ## ref: https://kubernetes.io/docs/concepts/services-networking/service/#internal-load-balancer
  ##
  //修改点2:默认为公网IP,此处修改为内部负载均衡IP
  annotations: {service.beta.kubernetes.io/alibaba-cloud-loadbalancer-address-type: "intranet"}
  ## @param service.labels Additional labels for redis service
  ##
  labels: {}
  ## @param service.type Service type for default redis service
  ## Setting this to LoadBalancer may require corresponding service annotations for loadbalancer creation to succeed.
  ## Currently supported types are ClusterIP (default) and LoadBalancer
  ##
  //修改点3:默认为ClusterIP,修改为LoadBalance
  type: LoadBalance
  ## @param service.clusterIP Service Cluster IP
  ## e.g.:
  ## clusterIP: None
  ##
  clusterIP: ""
  ## @param service.loadBalancerIP Load balancer IP if `service.type` is `LoadBalancer`
  ## If service.type is LoadBalancer, request a specific static IP address if supported by the cloud provider, otherwise leave blank
  ##
  //修改点4:可以指定IP,不指定则系统自动分配
  loadBalancerIP: "172.16.0.8"
  ## @param service.loadBalancerSourceRanges Service Load Balancer sources
  ## ref: https://kubernetes.io/docs/tasks/access-application-cluster/configure-cloud-provider-firewall/#restrict-access-for-loadbalancer-service
  ## e.g:
  ## loadBalancerSourceRanges:
  ##   - 10.10.10.0/24
  ##
  loadBalancerSourceRanges: []
  ## @param service.externalTrafficPolicy Service external traffic policy
  ## ref https://kubernetes.io/docs/tasks/access-application-cluster/create-external-load-balancer/#preserving-the-client-source-ip
  ##
  externalTrafficPolicy: Cluster
  ## @param service.sessionAffinity Session Affinity for Kubernetes service, can be "None" or "ClientIP"
  ## If "ClientIP", consecutive client requests will be directed to the same Pod
  ## ref: https://kubernetes.io/docs/concepts/services-networking/service/#virtual-ips-and-service-proxies
  ##
  sessionAffinity: None
  ## @param service.sessionAffinityConfig Additional settings for the sessionAffinity
  ## sessionAffinityConfig:
  ##   clientIP:
  ##     timeoutSeconds: 300
  ##
  sessionAffinityConfig: {}
  ## Headless service properties
  ##
  headless:
    ## @param service.headless.annotations Annotations for the headless service.
    ##
    annotations: {}
## Enable persistence using Persistent Volume Claims
## ref: https://kubernetes.io/docs/concepts/storage/persistent-volumes/
##
4.3 无需修改
此部分是各个cluster节点的配置,无需修改
## Redis® Cluster settings
##
cluster:
  ## @param cluster.init Enable the initialization of the Redis® Cluster
  ##
  init: true
  ## Number of Redis® nodes to be deployed
  ##
  ## Note:
  ## This is total number of nodes including the replicas. Meaning there will be 3 master and 3 replica
  ## nodes (as replica count is set to 1 by default, there will be 1 replica per master node).
  ## Hence, nodes = numberOfMasterNodes + numberOfMasterNodes * replicas
  ##
  ## @param cluster.nodes The number of master nodes should always be >= 3, otherwise cluster creation will fail
  ##
  nodes: 6
  ## @param cluster.replicas Number of replicas for every master in the cluster
  ## Parameter to be passed as --cluster-replicas to the redis-cli --cluster create
  ## 1 means that we want a replica for every master created
  ##
  replicas: 1
  ## Configuration to access the Redis® Cluster from outside the Kubernetes cluster
  ##
  externalAccess:
    ## @param cluster.externalAccess.enabled Enable access to the Redis
    ##
    enabled: false
    ## @param cluster.externalAccess.hostMode Set cluster preferred endpoint type as hostname
    ## ref: https://github.com/redis/redis/pull/9530
    ##
    hostMode: false
    service:
      ## @param cluster.externalAccess.service.disableLoadBalancerIP Disable use of `Service.spec.loadBalancerIP`
      ##
      disableLoadBalancerIP: false
      ## @param cluster.externalAccess.service.loadBalancerIPAnnotaion Name of annotation to specify fixed IP for service in. Disables `Service.spec.loadBalancerIP` if not empty
      ##
      loadBalancerIPAnnotaion: ""
      ## @param cluster.externalAccess.service.type Type for the services used to expose every Pod
      ## At this moment only LoadBalancer is supported
      ##
      type: LoadBalancer
      ## @param cluster.externalAccess.service.port Port for the services used to expose every Pod
      ##
      port: 6379
      ## @param cluster.externalAccess.service.loadBalancerIP Array of load balancer IPs for each Redis® node. Length must be the same as cluster.nodes
      ##
      loadBalancerIP: []
      ## @param cluster.externalAccess.service.loadBalancerSourceRanges Service Load Balancer sources
      ## ref: https://kubernetes.io/docs/tasks/access-application-cluster/configure-cloud-provider-firewall/#restrict-access-for-loadbalancer-service
      ## e.g:
      ## loadBalancerSourceRanges:
      ##   - 10.10.10.0/24
      ##
      loadBalancerSourceRanges: []
      ## @param cluster.externalAccess.service.annotations Annotations to add to the services used to expose every Pod of the Redis® Cluster
      ##
      annotations: {}
  ## This section allows to update the Redis® cluster nodes.
5. 安装部署
5.1 安装redis 集群
# 安装 redis 集群
helm -n my-namespace install my-redis-cluster bitnami/redis-cluster -f values.yaml
得到如下安装信息,如果安装报错,此处也会展示日志
]# helm -n my-namespace install my-redis-cluster -f values.yaml .

NAME: my-redis-cluster
LAST DEPLOYED: Fri Mar 15 09:30:09 2024
NAMESPACE: my-namespace
STATUS: deployed
REVISION: 1
TEST SUITE: None
NOTES:
CHART NAME: redis-cluster
CHART VERSION: 9.8.1
APP VERSION: 7.2.4** Please be patient while the chart is being deployed **


To get your password run:
    export REDIS_PASSWORD=$(kubectl get secret --namespace "my-namespace" my-redis-cluster-redis-cluster -o jsonpath="{.data.redis-password}" | base64 -d)

You have deployed a Redis® Cluster accessible only from within you Kubernetes Cluster.INFO: The Job to create the cluster will be created.To connect to your Redis® cluster:

1. Run a Redis® pod that you can use as a client:
kubectl run --namespace my-namespace my-redis-cluster-redis-cluster-client --rm --tty -i --restart='Never' \
 --env REDIS_PASSWORD=$REDIS_PASSWORD \
--image docker.io/bitnami/redis-cluster:7.2.4-debian-12-r9 -- bash

2. Connect using the Redis® CLI:

redis-cli -c -h my-redis-cluster-redis-cluster -a $REDIS_PASSWORD
5.2 查看部署的 redis 集群
]# helm ls -n my-namespace
NAME            NAMESPACE       REVISION        UPDATED                                 STATUS          CHART                   APP VERSION
my-redis-cluster   redis           2               2022-09-22 16:38:46.018087963 +0800 CST deployed        redis-cluster-8.2.4     7.0.5
查看安装历史
]# helm history my-redis-cluster -n redis
REVISION        UPDATED                         STATUS          CHART                   APP VERSION     DESCRIPTION
1               Thu Sep 22 16:25:49 2022        superseded      redis-cluster-8.2.4     7.0.5           Install complete
2               Thu Sep 22 16:38:46 2022        deployed        redis-cluster-8.2.4     7.0.5           Upgrade complete
5.2 查看部署的 POD
]# kubectl get pod -n my-namespace
NAME              READY   STATUS    RESTARTS      AGE
my-redis-cluster-0   1/1     Running   1 (22s ago)   83s
my-redis-cluster-1   1/1     Running   1 (50s ago)   83s
my-redis-cluster-2   1/1     Running   1 (22s ago)   83s
my-redis-cluster-3   1/1     Running   1 (21s ago)   83s
my-redis-cluster-4   1/1     Running   1 (21s ago)   83s
my-redis-cluster-5   1/1     Running   1 (19s ago)   83s
5.3 查看部署的SVC
//查看server
]# kubectl get svc -n redis-namespace
NAME                                TYPE        CLUSTER-IP      EXTERNAL-IP   PORT(S)              AGE
my-redis-cluster            LoadBalancer   10.20.161.245   172.16.0.8        6379/TCP             11m
my-redis-cluster-headless   ClusterIP   None            <none>        6379/TCP,16379/TCP   11m
6. 验证 redis 集群
]# kubectl exec -it my-redis-cluster-0 -n my-namespace bash
I have no name!@my-redis-cluster-0:/$ redis-cli
127.0.0.1:6379> auth redis123
OK
127.0.0.1:6379>keys *
//验证是否集群模式
127.0.0.1:6379>cluster nodes
//执行结果
a18a5aa0a16f2fd9d389fe83a39e1bcf28611d3d 10.10.2.4:6379@16379 master - 0 1665371671970 1 connected 0-5460
de4021c3c1611382270a90cad0bb43025d24e7b2 10.10.2.6:6379@16379 slave a18a5aa0a16f2fd9d389fe83a39e1bcf28611d3d 0 1665371670000 1 connected
b54b8cb69585febff3d46420e6b99a1a2c244232 10.10.1.5:6379@16379 master - 0 1665371672000 2 connected 5461-10922
8de10b6d34d3afcebc39120bcd28a07306140eef 10.10.1.6:6379@16379 slave b54b8cb69585febff3d46420e6b99a1a2c244232 0 1665371671000 2 connected
8b72dfdaac832d01c3669e9086c0272909eb256b 10.10.2.5:6379@16379 myself,master - 0 1665371669000 3 connected 10923-16383
bc55361f4715ed0ecaeab2b455d722e0f871b732 10.10.1.7:6379@16379 slave 8b72dfdaac832d01c3669e9086c0272909eb256b 0 1665371672980 3 connected
除此之外,可以再在redis客户端连接验证,如果验证无问题,SVC信息中的EXTERNAL-IP即可配置在软件服务中访问redis集群使用,密码是上文修改点1中修改的密码。
7. 常见问题
- 启动redis没有成功
]# kubectl get pod -n my-namespace
NAME              READY   STATUS    RESTARTS      AGE
my-redis-cluster-0   0/1     Running   1 (22s ago)   83s
my-redis-cluster-1   0/1     Running   1 (50s ago)   83s
my-redis-cluster-2   0/1     Running   1 (22s ago)   83s
my-redis-cluster-3   0/1     Running   1 (21s ago)   83s
my-redis-cluster-4   0/1     Running   1 (21s ago)   83s
my-redis-cluster-5   0/1     Running   1 (19s ago)   83s
//查看server
]# kubectl get svc -n my-namespace
NAME                                TYPE        CLUSTER-IP      EXTERNAL-IP   PORT(S)              AGE
my-redis-cluster            LoadBalancer   10.20.161.245   172.16.0.8        6379/TCP             11m
my-redis-cluster-headless   ClusterIP   None            <none>        6379/TCP,16379/TCP   11m
此时使用EXTERNAL-IP是连接不上的,因为POD没有启动成功,STATUS 0/1,可以执行如下命令查看启动报错的原因:
]# kubectl logs -f my-redis-cluster-0 -n my-namespace
redis-cluster 03:11:24.95 INFO  ==> ** Redis setup finished! **
1:C 15 Mar 2024 03:11:24.997 # WARNING: Changing databases number from 16 to 1 since we are in cluster mode
1:C 15 Mar 2024 03:11:24.997 * oO0OoO0OoO0Oo Redis is starting oO0OoO0OoO0Oo
1:C 15 Mar 2024 03:11:24.997 * Redis version=7.2.4, bits=64, commit=00000000, modified=0, pid=1, just started
1:C 15 Mar 2024 03:11:24.997 * Configuration loaded
1:M 15 Mar 2024 03:11:24.997 * monotonic clock: POSIX clock_gettime
                _._
           _.-``__ ''-._
      _.-``    `.  `_.  ''-._           Redis 7.2.4 (00000000/0) 64 bit
  .-`` .-```.  ```\/    _.,_ ''-._
 (    '      ,       .-`  | `,    )     Running in cluster mode
 |`-._`-...-` __...-.``-._|'` _.-'|     Port: 6379
 |    `-._   `._    /     _.-'    |     PID: 1
  `-._    `-._  `-./  _.-'    _.-'
 |`-._`-._    `-.__.-'    _.-'_.-'|
 |    `-._`-._        _.-'_.-'    |           https://redis.io
  `-._    `-._`-.__.-'_.-'    _.-'
 |`-._`-._    `-.__.-'    _.-'_.-'|
 |    `-._`-._        _.-'_.-'    |
  `-._    `-._`-.__.-'_.-'    _.-'
      `-._    `-.__.-'    _.-'
          `-._        _.-'
              `-.__.-'

1:M 15 Mar 2024 03:11:24.998 * No cluster configuration found, I'm aaaaaaaaaaaaaaa
......
1:S 15 Mar 2024 03:11:36.886 # Error condition on socket for SYNC: Connection refused
1:S 15 Mar 2024 03:11:37.100 * Connecting to MASTER *******:6379
1:S 15 Mar 2024 03:11:37.100 * MASTER <-> REPLICA sync started
1:S 15 Mar 2024 03:11:37.101 # Error condition on socket for SYNC: Connection refused
- Service Mesh - Kubernetes LoadBalancer Service External IP 一直处于 pending 状态
如果你使用自建的 Kubernetes 集群(minikube、kubeadm 等)。在这种情况下,没有集成 LoadBalancer(与 AWS、Google Cloud、阿里云等云厂商不同)。使用此默认设置,你只能使用 NodePort 或 Ingress Controller。这时,如果你部署 LoadBalancer 则会出现 External-IP 一直处于 pending 的问题。
参考
https://www.orchome.com/16821(与本篇博客无关)
https://www.cnblogs.com/devopsyyds/p/16719945.html
https://www.cnblogs.com/maiblogs/p/16771609.html
https://www.cnblogs.com/evescn/p/16342899.html
https://artifacthub.io/packages/helm/bitnami/redis-cluster
https://kubernetes.io/docs/tasks/access-application-cluster/create-external-load-balancer/#preserving-the-client-source-ip